| |
Dragon on treasure hoard: armature for the base
Now you've got your basic dragon wireframe, it's time to create a
base. Normally, you would do this after you've almost finished your
figure and were about to bake it, but because the base is part of
the armature itself (for the hoard) and the dragon it's easier to do
it now.
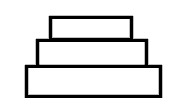 I think you can use a real piece of rock if you want, but otherwise
you can take some cardboard, wood, or European (non-toxic) styrofoam and
cut or saw it into round layers, as shown in the example.
A bit like the towers of Hanoi.
I think you can use a real piece of rock if you want, but otherwise
you can take some cardboard, wood, or European (non-toxic) styrofoam and
cut or saw it into round layers, as shown in the example.
A bit like the towers of Hanoi.
Easier, if you've got a big piece of European foam, you can cut a halfphere
right out of it. Some craft shops even sell foam spheres you can cut in half.
 Nail or glue your base pieces together. If you sawed your base from
wood and have got any leftovers, make them a bit smaller and glue them
to the base to cover up the steps. That gives it a more rounded, but
rough, rocklike appearance.
Nail or glue your base pieces together. If you sawed your base from
wood and have got any leftovers, make them a bit smaller and glue them
to the base to cover up the steps. That gives it a more rounded, but
rough, rocklike appearance.
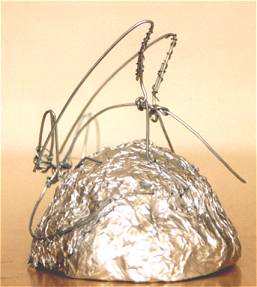
After you've created the base, cover it with tinfoil.
Finally, attach the dragon armature to the base. In the picture, I
already attached the wireframe dragon to the base, so I had to take it off
again to cover the dragon body with tinfoil, in this course I've reversed
these steps of course.


|
